Glazing & Decorating
How to Use Slip and Sgraffito to Decorate Pottery
Learn the sgraffito pottery technique: coat leather-hard clay with contrasting slip, then carve through to reveal patterns beneath. Step-by-step guide.
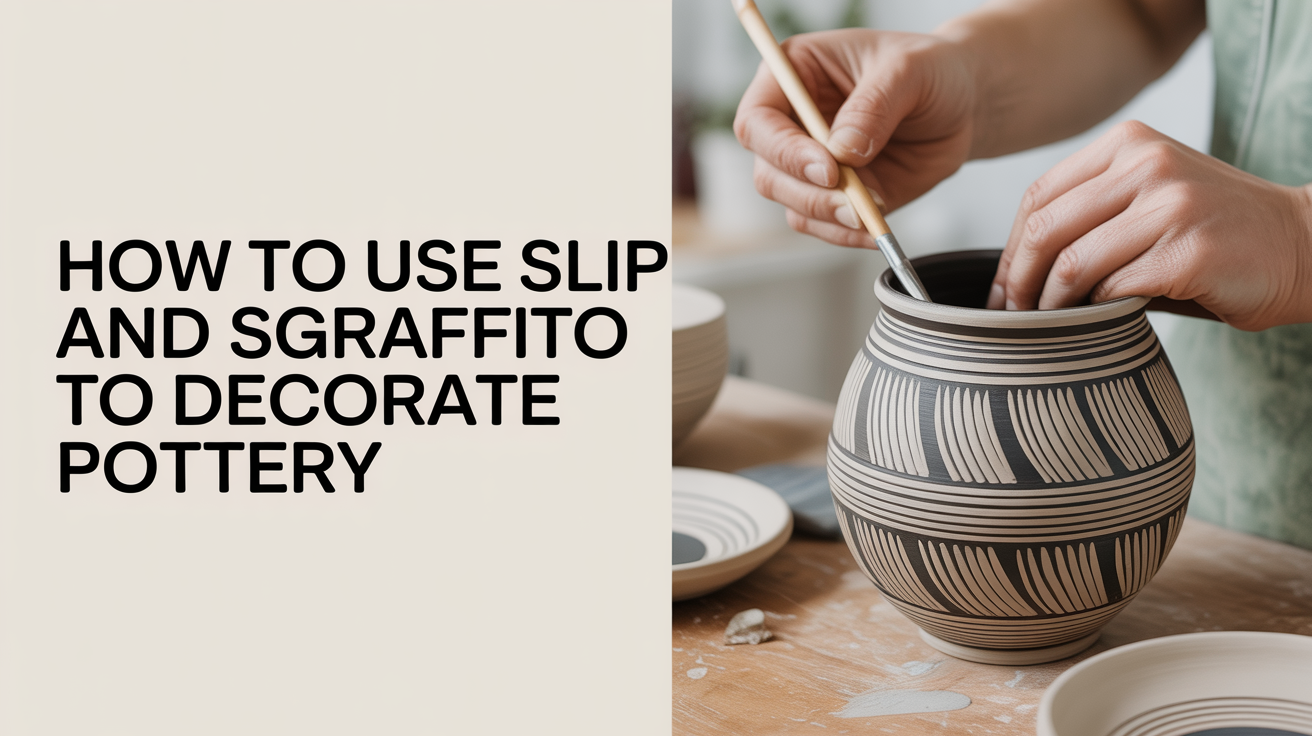
Sgraffito is one of those techniques that feels almost magical once you understand the logic: you coat your leather-hard piece with a layer of contrasting slip, let it firm up to just the right stage, and then carve through to reveal the clay color beneath. The result is crisp, graphic linework with a depth that painted surfaces rarely achieve. It takes patience to get the timing right, but the control it gives you over surface decoration is hard to match.
What Slip Actually Is
Slip is simply clay suspended in water until it reaches a creamy, pourable consistency, somewhere between heavy cream and yogurt depending on the intended use. It can be the same clay body as your piece, colored with ceramic oxides or commercial stains, or made from an entirely different clay.
Contrasting Slip for Sgraffito
For sgraffito to read clearly, the slip color needs to contrast with the clay body underneath. A red earthenware piece pairs well with a white or light buff slip. Porcelain or white stoneware benefits from dark slips made with iron oxide or black mason stain. Some potters mix a few batches in different shades and layer them for more complex effects.
The slip consistency matters too. For sgraffito, you want it thick enough to coat without dripping, thin enough to apply in a single smooth pass. A good test is to dip a finger and pull it out. The slip should coat the finger and hold its shape without running. If it sheets off cleanly, it is too thin. If it leaves lumps, add a little water.
Applying Slip to Leather-Hard Clay
Timing is the most critical variable in slip decoration pottery. The clay needs to be leather hard, firm enough to hold its shape without distorting, but not so dry that it rejects the moisture in the slip or cracks from the stress.
How to Test for Leather Hard
Press a fingertip gently into an inconspicuous area. Leather hard clay will leave a faint impression without sticking to your skin. If the clay is cold and shiny, it is still too wet. If it feels room temperature and slightly matte, you are in range. A piece at early leather hard (still cool, slightly pliable) is best for inlaid slip. A piece at late leather hard (firm, no longer pliable, approaching bone dry) may crack under the moisture load of thick slip.
Steps for Applying a Slip Coat
- Make sure the piece is uniformly leather hard before you start. Uneven drying causes the slip to crack or peel in some spots.
- Stir the slip thoroughly. Colorants and clay settle fast, and unstirred slip gives you blotchy coverage.
- Pour, dip, or brush the slip onto the surface. Pouring gives the most even coat on the inside of bowls. Dipping works well for small forms. Brushing is fine but can leave stroke marks that show after carving.
- Apply a consistent layer, roughly 1 to 2 millimeters thick. Too thin and the clay color bleeds through. Too thick and it flakes during carving.
- Let the piece dry until the slip loses its sheen. At this point the top surface is firm but the layer underneath is still slightly moist. This is the ideal carving window.
The Sgraffito Carving Technique
The word sgraffito comes from the Italian verb "sgraffiare," meaning to scratch. That is exactly what you are doing: scratching or carving away the slip layer to expose the clay beneath. The lines can be fine and delicate, or wide and expressive, depending on the tool and the pressure you use.
Tools for Sgraffito
You do not need specialized equipment to start, though purpose-made tools help.
- Loop tools with small wire loops cut cleanly and remove slip efficiently on wider areas
- Needle tools or steel scribers draw fine, precise lines
- Dental picks or old ballpoint pen nibs reach tight curves
- Linoleum carving gouges work well for broader, textured marks
- Wooden skewers give soft, variable lines and are useful for sketching out a design before committing
A sharp edge is more important than any specific tool. Dull tools drag and tear rather than cut, which smears the slip edges and muddies the contrast.
Carving Steps
- Sketch the design lightly with a needle tool before removing any material. Faint scratch lines in the slip are easy to ignore if you change your mind. Heavy gouges are not.
- Work from the top of the piece downward so falling slip crumbs do not land on freshly carved areas.
- Hold the tool at a low angle, roughly 30 to 45 degrees to the surface, and pull toward you rather than pushing away. This keeps the edge clean.
- Remove slip crumbs with a soft brush. Do not blow on the piece. The moisture in your breath can rehydrate the slip and smear the edges.
- Step back regularly to assess the design from a distance. Details that look bold up close often disappear in the finished piece.
Getting the Timing Right
This is where most beginners run into trouble. The window between too wet and too dry is real, and it is shorter than you might expect.
Too wet: The slip is still shiny and soft. Carving into it produces ragged, smeared lines. The tool drags clay along with the slip and the edge of the carved line crumbles or curls over instead of staying crisp.
Too dry: The slip has become brittle. Carving causes it to chip and flake rather than cut cleanly. You lose the edge of your design to irregular fractures, and fine detail is nearly impossible.
The sweet spot: The slip surface is matte and firm to the touch but gives slightly under pressure from your fingernail. At this stage, a loop tool or needle moves through it like carving soft cheese. Lines are clean and the edges hold.
On a humid day, this window can last an hour or more. On a warm, dry day, you may have 15 to 20 minutes. Cover the piece loosely with plastic if you need to pause. Uncovering it periodically to check the surface is better than letting it dry past the point of no return.
Other Ways to Decorate with Slip
Sgraffito is one approach, but slip decoration pottery encompasses a range of techniques that can be combined or used on their own.
Slip Trailing
Slip trailing uses a squeeze bottle, a bulb syringe, or a traditional slip trailer to pipe lines and dots of colored slip onto the surface. Think of it like writing with a thick pen. Trailing works best on soft leather hard clay, where the applied slip fuses slightly into the surface. On clay that is too dry, the trailed lines sit on top and can crack off after firing.
Brushed Slip Patterns
You can brush colored slip onto the surface freehand, using it much like paint. Multiple layers of different colors, each allowed to firm up before the next is applied, create depth. Brushed slip on leather hard clay stays where you put it without spreading, which gives you cleaner edges than brushing on wet clay.
Layering and Combining Techniques
Some potters apply a first coat of slip, carve a broad sgraffito pattern, then brush a second contrasting color into the carved recesses. After the second layer firms up, they carve again. The result is a multi-tone surface with a lot of visual complexity. It takes planning, but the process is straightforward once you understand how each layer needs to dry before the next step.
Sealing the Surface with Clear Glaze
Once the piece is bone dry and bisque fired, the slip decoration is stable but porous. To protect it and give the surface a finished look, you will want to apply a clear glaze over the top. A liner glaze or clear base coat works well. If you want the natural matte texture of the slip to show, a satin or matte clear is a better choice than a high-gloss one.
For detailed guidance on application methods, how to apply glaze by brushing, dipping, and pouring covers the practical specifics. The goal is an even, thin coat that does not fill the carved lines with glaze pooling. If you are layering commercial colors over the sgraffito, underglaze for beginners explains how underglazes behave differently from slips and where they fit in the firing sequence.
A few tips for glazing sgraffito pieces:
- Brush the clear glaze on in thin coats rather than dipping, which can deposit too much in the carved recesses
- Use a fan brush across carved areas to avoid disturbing the edges of your design
- Let each brushed coat dry fully before adding the next
- Check that the carved lines are still clear after glazing. If they have filled in, a light pass with a damp brush before the glaze dries fully can open them back up
Frequently Asked Questions
Can I do sgraffito on wet clay instead of leather hard?
You can scratch into wet clay, but the results look different and the process is harder to control. Wet clay does not hold a crisp edge, so carved lines tend to be soft and uneven. Most sgraffito is done on leather hard clay for this reason. The firmer surface lets tools cut cleanly.
What happens if the slip cracks before I carve it?
Fine hairline cracks in the slip usually mean the piece dried a little too fast, or the slip was applied too thick, or the clay was drier than ideal. You can still carve through cracked slip, but the design will show those fractures. To minimize the risk in future, apply a thinner slip coat and dry the piece slowly under a loose plastic tent.
Do I need to bisque fire before applying slip?
No. Slip is applied to raw, leather-hard clay, not bisqueware. This is what distinguishes slip from glaze and underglaze, both of which typically go on bisque-fired clay. Applying slip to bone dry or bisqued clay usually results in it peeling off during drying or firing.
Can I use any clay as slip, or does it need to match my clay body?
For sgraffito, the slip ideally has a similar shrinkage rate to the clay body. A big mismatch in shrinkage causes the slip to crack, peel, or flake during drying and firing. Many potters use the same clay body as the piece, adding colorant to create contrast. Commercial slips formulated for broad compatibility are another option and reduce the guesswork.
How do I keep carved lines from filling in with glaze?
Use a thin, fluid clear glaze rather than a thick one, and apply it lightly. Brush it on in two or three thin coats rather than one heavy one. If the glaze still pools in carved areas, try a wax resist: paint melted wax or liquid wax resist into the carved lines before glazing. The glaze will bead off the waxed areas, leaving the lines clear.