Glazing & Decorating
How to Apply Glaze: Brushing, Dipping, and Pouring
Learn how to apply pottery glaze using brushing, dipping, and pouring. Covers prep, coat counts, foot wiping, and which method suits your work.
Glazing is the step that transforms a dull bisque pot into something people want to pick up and use. There are three main ways to apply pottery glaze: brushing, dipping, and pouring. Each has real strengths, and choosing the right one depends on your piece size, the effect you want, and what equipment you have on hand.
Preparing Your Bisqueware
Good glaze application starts before you open a single jar. Bisque-fired clay is porous, which is exactly what you want, but it also picks up finger oils and dust that can cause glaze to crawl away from the surface in the kiln.
Cleaning and Dusting
Wipe every piece with a barely damp sponge. Let it dry completely before you glaze. If a pot has been sitting on a shelf, blow off any dust or brush it away with a dry, soft-bristle brush. Even a thin film of grease from handling can leave bare, crawling patches after firing.
Check for any sharp burrs on the rim or foot. Run your finger along the edge. A light pass with a damp sponge or fine sandpaper takes them down without weakening the piece.
Waxing the Foot
Apply wax resist to the foot ring before you glaze. The foot sits directly on the kiln shelf. If glaze melts there, the pot fuses to the shelf and you lose both the piece and the shelf. Wax resist soaks into the bisque and repels liquid glaze. Brush it on in one smooth coat, let it dry two to three minutes, then proceed. Even if you plan to wipe the foot clean at the end, wax is a reliable backup.
For a deeper look at what glaze actually does inside the kiln, how pottery glaze works: a beginner's guide covers the chemistry without the jargon.
The Three Application Methods
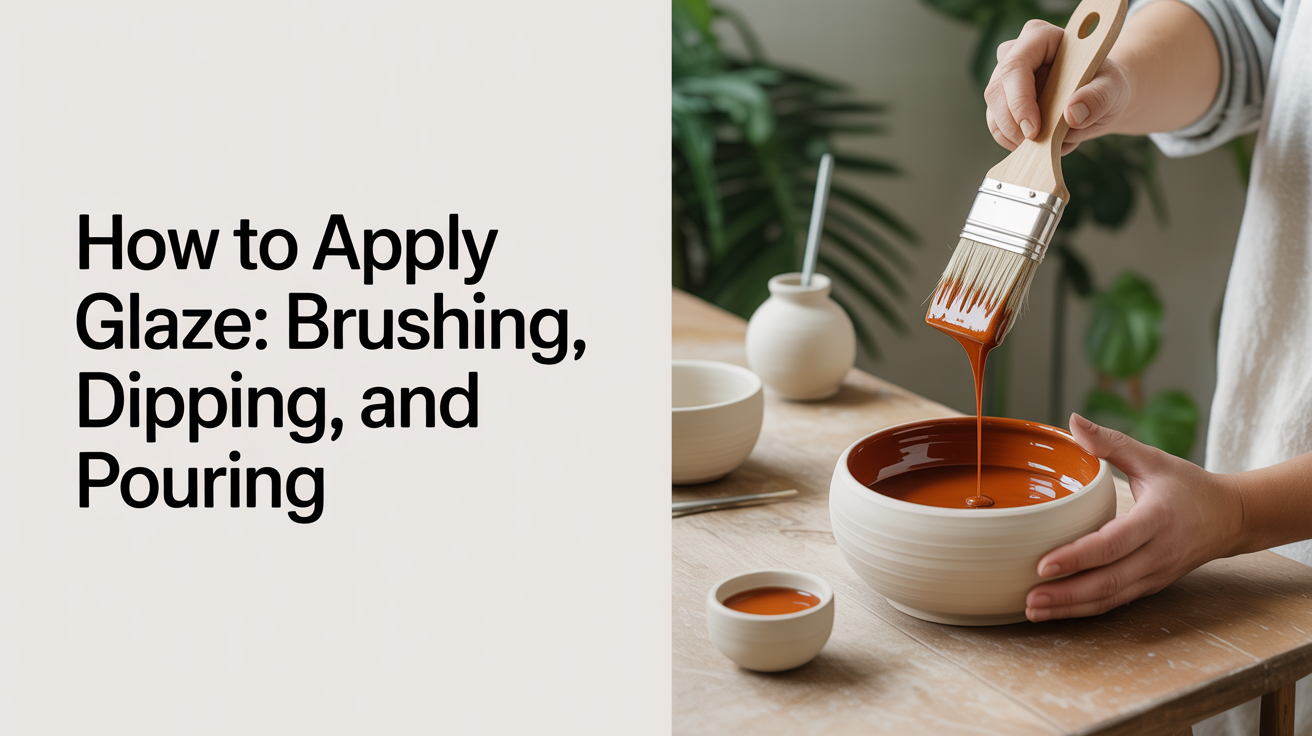
Brushing
Brushing is the most accessible method. You need nothing more than a soft, thick glaze brush (a fan brush or a wide hake brush both work well) and a jar of well-stirred glaze.
How to brush glaze onto pottery:
- Stir the glaze thoroughly. Ceramic colorants and opacifiers settle fast. Unstirred glaze gives uneven color.
- Load the brush generously. Drag it in one direction rather than scrubbing back and forth, which can pull up the previous coat.
- Apply three coats for most commercial brushing glazes. Let each coat dry until the sheen disappears (usually two to four minutes) before adding the next.
- Alternate the direction of each coat at roughly 90 degrees. This fills in any thin spots from the previous pass.
- Wipe the foot clean with a damp sponge after the final coat.
Brushing is ideal for smaller pieces, for painting glaze in sections, and for layering multiple colors. It gives you fine control over where glaze goes and where it doesn't. The tradeoff is consistency: brush strokes can show, especially with opaque or satin glazes. Some potters use this intentionally for a textured, painterly look. Others find it frustrating on large, simple forms.
Dipping
Dipping is the fastest and most consistent method for whole-piece coverage. You lower the pot into a bucket of glaze, hold it for two to three seconds, lift it out at a steady angle, and set it down to dry. Done well, you get an even coat in one motion.
How to dip pottery glaze:
- Use a bucket large enough that the piece clears the sides without touching. A 3- to 5-gallon bucket works for most mugs and bowls.
- Stir the glaze until no sediment remains on the bottom. Check with a stick.
- Hold the piece at the foot, lower it into the glaze all the way to your fingers, and count two to three seconds.
- Lift smoothly at a slight angle so excess glaze runs off one edge rather than pooling.
- Set it down on a bat or wire rack. Once the sheen dulls, turn it over and dip the other section if needed.
- Two dips usually give a good single coat. Most dipping glazes need two to three coats total, so repeat the process after drying.
- Wipe the foot ring thoroughly before it goes in the kiln.
The main barrier to dipping is volume. You need enough glaze to submerge the piece, which means mixing at least a gallon (often more) of any glaze you plan to use this way. That's not a problem in a shared studio, but it's a real consideration at home.
Pouring
Pouring works well for the inside of tall forms like vases and cylinders, or for the outside of large platters and bowls that won't fit in a dipping bucket. It uses less glaze than dipping and handles awkward shapes that can't be submerged easily.
How to pour glaze:
- For the inside: hold the piece over a catch basin (a large bowl or plastic tub). Pour a cup or two of glaze into the opening, rotate the piece slowly to coat the interior walls, then tip it to let the excess pour out. Work fast before the glaze soaks in.
- For the outside: set the piece on a wire rack over a catch basin. Pour glaze over the outside surface from a pitcher or ladle, rotating the piece as you go. Let the excess drip into the basin below.
- Two to three coats are typical. Wait for each to dry.
- Wipe the foot.
Pouring can leave drips and ridges if you're not careful. Practice the rotation motion before committing to a finished pot, and have a sponge ready to smooth any blobs.
Comparing the Three Methods
| Method | Best For | Coats Needed | Gear Required | Difficulty |
|---|---|---|---|---|
| Brushing | Detail work, small pieces, layering colors | 3 | Brush, jar, turntable optional | Low |
| Dipping | Uniform whole-piece coverage, production runs | 2-3 | Bucket, 1+ gallon of glaze | Low to medium |
| Pouring | Tall interiors, large platters, low glaze volume | 2-3 | Pitcher, catch basin, wire rack | Medium |
Key points to keep in mind:
- Stir your glaze every time, not just at the start of a session. It settles constantly.
- Glaze should coat like heavy cream. If it drips off thin and watery, it needs more powder. If it lumps and tears, add small amounts of water and stir.
- Always wipe the foot. Always. One forgotten foot ring ruins a kiln shelf and usually the pot.
- Let each coat dry before adding the next. Wet-on-wet causes runs and uneven thickness.
- More coats aren't always better. Four heavy coats of a runny glaze can pour off the pot onto the shelf during firing.
Coat Count and Thickness
The standard advice is two to three coats, and that's a good starting place, but glaze type matters. Matte glazes often need three full coats to develop their surface without bare spots. Some crystalline and specialty glazes specify a single thick coat to form the right crystal structure. Always check the glaze manufacturer's recommendation or test tiles if you're working with an unfamiliar glaze.
A simple test: scratch through a dry coat with your fingernail. If the coat is correct, the scratch mark should be about the thickness of a credit card. Too thin and you'll see bare clay; too thick and the glaze may crawl or run.
You can also layer two different glazes intentionally for color effects. Brush a base coat first, dry it fully, then add the second color. For ideas on adding imagery before the glaze coat, underglaze for beginners: adding color and designs walks through the process.
Wiping the Foot Before Firing
This step gets its own section because skipping it is the most common beginner mistake. Any glaze on the bottom of a pot will melt and bond to the kiln shelf during firing. Kiln shelves are expensive. A pot fused to one is often a total loss for both.
After you finish glazing, flip the piece and look at the foot ring from below. Wipe any glaze from the flat contact surface with a damp sponge. If you applied wax resist earlier, the glaze should bead right off. If not, it takes a little more pressure.
Clean one centimeter (about half an inch) up from the bottom edge as a safety margin. Glaze runs down during firing, and what looks like it ends at the foot ring may creep lower than expected.
For decorating options that sit below the glaze layer, how to use slip and sgraffito to decorate pottery covers carving and slip techniques that work well before you glaze.
Frequently Asked Questions
How many coats of glaze do I need?
Most glazes need two to three coats for full, even coverage. Brushing glazes almost always specify three coats on the label. Dipping and pouring glazes tend to deposit a thicker layer per application, so two dips often match three brushed coats. When in doubt, test a tile first so you know what the finished surface looks like before committing to a pot.
Can I mix brushing, dipping, and pouring on the same pot?
Yes. A common approach is to pour the inside of a vase, then brush the outside with a contrasting color. Or dip the exterior for a base coat and brush details on top once it dries. Just make sure each layer is completely dry before adding the next, and plan your overlap zones so you don't end up with four layers of glaze in one area.
Why is my glaze crawling or peeling off after firing?
Crawling usually happens because the glaze was applied over a dusty or oily surface, the coat was too thick and cracked during drying, or the bisque temperature was too low (underfired bisque is too dense to absorb glaze well). It can also happen if you apply glaze over raw greenware that hasn't been bisque fired. Clean bisque, the right coat thickness, and a properly fired bisque temperature solve most crawling problems.
Do I have to use wax resist on the foot?
No, but it helps. You can skip wax and rely entirely on wiping the foot clean with a damp sponge after glazing. Wax is a useful backup because glaze can wick under the foot ring in ways that are hard to see until after firing. If you're dipping, a quick wax pass before you start saves cleanup time.
Can I glaze greenware instead of bisqueware?
Some potters do glaze greenware (single-fire or "raw glazing"), but it requires specific glazes formulated to survive the water shock and the temperature changes of a single firing. For beginners, glazing bisqueware is far more forgiving. The bisque firing burns off organics and creates a stable, porous surface that holds glaze reliably.