Getting Started
How to Set Up a Small Pottery Studio at Home
A practical guide to home pottery studio setup for beginners: choosing a space, work surfaces, water access, dust safety, storage, and the kiln question.
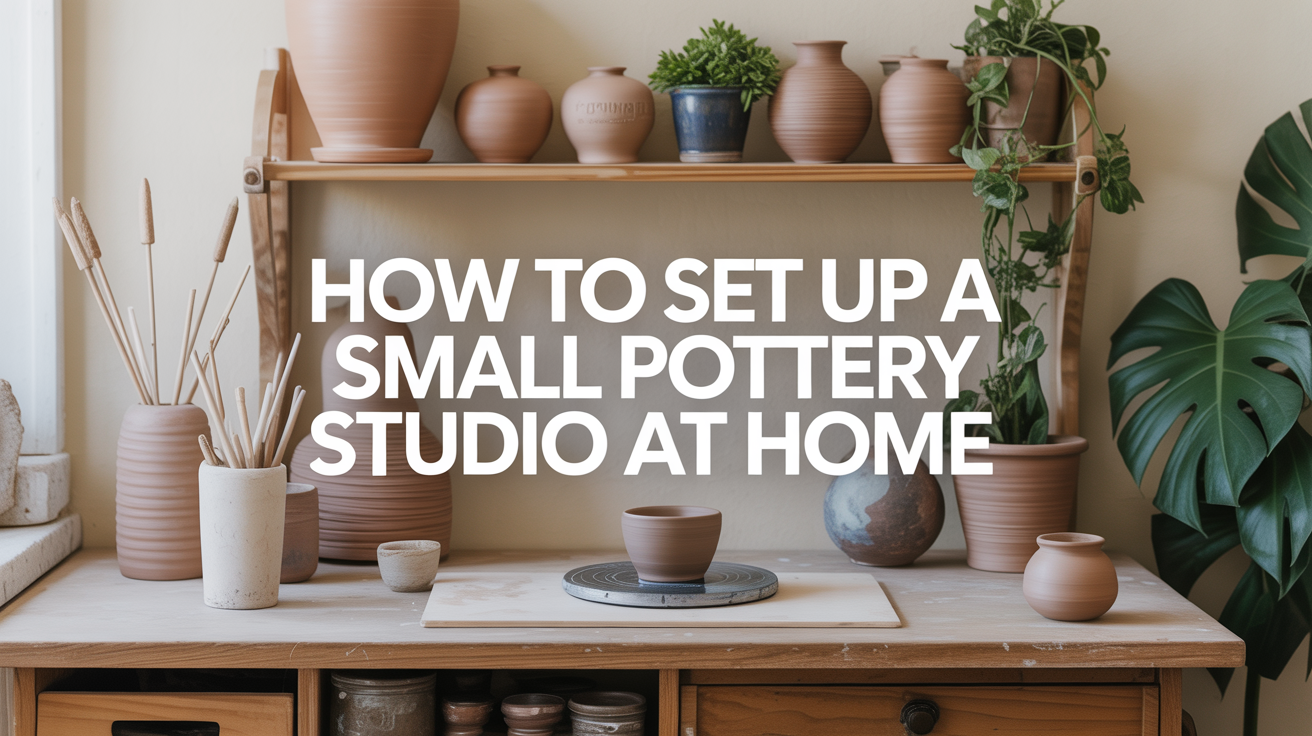
You don't need a dedicated barn or a professionally outfitted ceramics studio to start making pottery at home. A spare corner, a sturdy table, and a few smart choices about water and dust management will get you working clay within a weekend. The hardest part isn't finding space; it's knowing what actually matters and what you can skip for now.
Choosing the Right Space
Pottery is messy in a particular way: clay dries to a fine powder that clings to surfaces, settles into corners, and gets tracked through the house on shoes and clothes. The ideal home ceramics studio has a few non-negotiable traits: a floor you can wet-mop easily, decent ventilation, and access to a drain or utility sink.
Practical space options, ranked by ease:
- Garage or carport. Concrete floor, usually a utility sink nearby, no carpet. This is the easiest choice for cleanup and dust management.
- Basement. Similar advantages to a garage. Watch for dampness, which can slow drying unevenly.
- Spare room with hard flooring. Laminate or tile works. Carpet is a problem because clay dust settles into fibers and is nearly impossible to fully remove.
- Covered outdoor patio or shed. Viable in mild climates; temperature swings and humidity will affect your clay.
- A dedicated corner of a kitchen or utility room. Tight, but workable for hand-builders who don't need a wheel.
A space as small as 6 by 8 feet is genuinely usable for hand-building. Throwing on a wheel needs a bit more room, maybe 8 by 10, to accommodate the wheel, a bucket for water, and space to walk around the work.
The Work Surface
Your work surface does more than hold clay. It needs to be heavy enough to stay put while you're wedging (kneading clay to remove air pockets), easy to clean, and the right height so you're not hunching.
What works well:
- A solid-core door on sawhorses is a classic studio setup. It's flat, large, and inexpensive.
- A heavy butcher-block table or wooden workbench holds up to wedging without bouncing.
- A concrete slab or plaster bat mounted on a table is useful if you hand-build directly on the surface.
Height matters more than most beginners expect. For wedging, you want a surface roughly at hip height so you can use your body weight rather than just arm strength. If your only option is a standard 30-inch dining table, a yoga mat folded under your feet can help.
Avoid lightweight folding tables for anything involving wedging; they flex and walk around under pressure.
Water Access and Clay Dust Management
This is the most important section in this entire guide. Clay dust contains crystalline silica, a fine particle that can cause serious long-term lung damage (silicosis) with repeated inhalation over years. The risk is not from occasional brief exposure, but from regular dry sweeping or blowing clay dust into the air.
The rule is simple: always wet-clean your studio. Never dry-sweep.
Silica dust particles are too fine to see and too light to settle quickly. A broom sends them airborne for hours. A damp mop or wet sponge captures them and keeps them out of your lungs.
Practical dust-management steps:
- Mop the floor with a damp mop after every session, not a dry sweep.
- Wipe down surfaces with a wet sponge before the clay dries completely.
- Wear an N95 or P100 respirator when mixing dry clay powder, reclaim powder, or sanding bone-dry greenware.
- Keep a bucket of water at your table so you can clean tools while you work, rather than letting scraps dry and flake.
- Use a dedicated pair of shoes for studio work and leave them at the door.
For water access, the closer to a sink the better. A five-gallon bucket works fine for a hand-builder's water supply, but you'll fill and dump it often. A utility sink (laundry sink) is genuinely worth the investment if you're setting up a long-term space, because you can let clay-heavy water settle overnight. Never pour clay-heavy water directly down a household drain; the solids accumulate and cause clogs. Let the water sit in a bucket until the clay settles, then pour off the clear water and dispose of the clay sludge in the trash.
Storage for Clay, Tools, and Work in Progress
Clay dries out faster than most beginners expect, and work in progress is fragile before it's fired. Good storage is less about having the perfect setup and more about airtight containment.
Clay storage:
- Keep unopened bags in a cool spot away from direct sun. Most clays stay workable for months to a year if sealed.
- Opened bags: fold the bag tightly down, tape it closed, or transfer clay to a sealed plastic bin. A 10-gallon lidded tote works well.
- Reclaim clay (trimmings, failed pieces soaked in water) goes in a sealed bucket with a lid.
Work-in-progress storage:
- Greenware drying slowly: place pieces on a wire rack or wooden shelf and cover loosely with thin plastic sheeting. Slow, even drying reduces cracking.
- Pieces that need to stay wet overnight: drape a damp cloth over them, then a plastic bag, then leave them on a plaster bat if you have one.
- Bone-dry greenware (ready for bisque firing) is fragile; store it somewhere it won't be knocked over.
Tools:
A small toolbox or a silverware caddy is enough storage for a beginner's basic pottery toolkit. Most hand-building tools fit in a shoebox.
The Kiln Question
No part of the home pottery studio setup generates more questions than the kiln. Here's the straightforward breakdown.
Buying a kiln for home use:
- A small electric kiln (around 7 cubic feet) runs on a 240-volt, 50-amp circuit, similar to a clothes dryer. Many homes already have this capacity in a garage or utility room.
- Kilns reach 2200°F (1200°C) and need clearance on all sides, away from combustibles, with good ventilation. A downdraft vent that pulls fumes out of the room is standard for indoor installations.
- Entry-level used kilns cost $500 to $1,500. New mid-range kilns run $1,800 to $3,500.
- Check local zoning before buying. Some neighborhoods have restrictions on home kilns.
Using a local studio to fire your work:
This is the smarter starting point for most beginners. Community studios and ceramic co-ops charge per load or by the pound to fire your pieces. You hand-build at home, transport your dry greenware, and pick up your fired work later. It removes the electrical upgrade, ventilation, and kiln-maintenance costs entirely until you know pottery is a long-term commitment.
If you're just getting started with clay, read through pottery for absolute beginners before committing to a kiln purchase.
Zone-by-Zone Setup Reference
| Studio Zone | What You Need |
|---|---|
| Work surface | Heavy table at hip height, plaster bat or canvas mat |
| Wedging area | Firm surface (concrete, plaster block), clearance on all sides |
| Water station | Bucket or utility sink, second bucket for clay waste water |
| Drying area | Wire rack or open shelf, away from direct heat or drafts |
| Greenware storage | Plastic-covered shelves, plaster bats for slow drying |
| Clay storage | Sealed plastic bins or tightly wrapped bags, cool and dark |
| Tools | Toolbox, caddy, or open tray near the work surface |
| Cleanup supplies | Damp mop, sponges, N95 respirator for dry-powder work |
Quick Setup Checklist
Before your first session, confirm you have:
- A mop-able floor (not carpet)
- A heavy, stable work surface at the right height
- Access to water and a clay-safe drain setup
- A sealed container for clay scraps and reclaim
- A damp mop and sponges for cleanup
- An N95 respirator for any dry clay work
- A plan for firing (home kiln or local studio)
Deciding Between Hand-Building and Throwing
Your space requirements shift depending on whether you plan to hand-build or throw on a wheel. Hand-building needs very little room and no electricity beyond good lighting. A wheel needs floor space, a dedicated outlet, and a splash pan that you'll be cleaning constantly.
If you're undecided, hand-building vs. throwing covers the practical trade-offs in detail. Most beginners find hand-building less intimidating to start, and it pairs well with a small home setup.
Frequently Asked Questions
How much space do I really need for a home pottery studio?
For hand-building, 40 to 50 square feet is workable. A dedicated corner of a garage or a spare room can fit a worktable, a drying shelf, and clay storage without feeling cramped. A pottery wheel setup needs a bit more room, roughly 60 to 80 square feet, once you account for the wheel footprint, a water bucket, and space to move around the piece while you work.
Is clay dust actually dangerous at home?
The risk is real but manageable with consistent habits. Crystalline silica in dry clay dust can cause silicosis with long-term repeated inhalation. The key word is repeated: occasional brief exposure isn't the concern. What causes problems is dry sweeping, sanding bone-dry pieces without a respirator, or mixing dry reclaim powder in an unventilated space over months and years. Wet-cleaning every session and wearing an N95 when working with dry powder keeps the risk very low.
Do I need a utility sink, or can I use a regular bathroom or kitchen sink?
You can start with buckets, but a regular household sink will clog over time if you're rinsing clay down it regularly. The clay particles don't dissolve; they accumulate in the P-trap. If you use a household sink, rinse tools into a bucket first, let it settle, then pour off just the clear water into the drain. A utility sink with a trap that you clean periodically is the better long-term solution.
Can I set up a pottery space in a rental apartment?
Yes, with limits. Hand-building with pre-wedged clay from sealed bags works fine in a kitchen or bathroom with tile floors. The bigger challenge is dust management in a carpeted space, water disposal, and firing. Many apartment potters hand-build at home and fire at a local studio. It's worth confirming your lease allows hobby use before investing in equipment.
What's the minimum I need to spend to start hand-building pottery at home?
A 25-pound bag of earthenware or stoneware clay runs $15 to $25. A basic set of hand-building tools (wire cutter, wooden knife, loop tool, sponge) costs $15 to $30. If you already have a sturdy table and mopping supplies, you can start for under $50. The kiln is the major cost, and you can defer that by firing at a local studio.