Glazing & Decorating
How to Use Wax Resist to Create Patterns on Pottery
Learn how to use wax resist on pottery to create clean two-tone patterns, protect foot rings, and layer glazes with confidence.
Wax resist is one of the most satisfying decorating tools in a beginner's kit. You paint it onto bisqueware wherever you want glaze to stay away, let it dry, then glaze over the top. The glaze beads off the waxed areas, leaving clean boundaries. In the kiln, the wax burns off completely around cone 06 or so, and what remains is exactly the pattern you planned.
This guide covers what type of wax to buy, how to apply it, how to layer a second glaze color over it, and the mistakes that trip up beginners most often.
What Wax Resist Is and Why It Works
Wax resist works on a simple principle: glaze is water-based, and wax repels water. When you brush wax emulsion onto bisqueware and then pour or brush glaze over it, the glaze slides off the waxed surface rather than absorbing into the clay. The wax holds a crisp edge, so the boundary between glazed and unglazed areas comes out clean.
The wax itself disappears in the kiln. As the temperature climbs during a glaze firing, the wax oxidizes and burns away well before the glaze starts to melt. There is no wax residue left in the finished piece.
Two types are commonly used:
Wax emulsion is water-based, water-soluble while wet, and the standard choice for studio work. It cleans up with water, which means you can rinse brushes and your hands before the wax sets. Once dry, it is water-resistant until it burns in the kiln.
Hot wax (paraffin melted over a hot plate) works on the same principle but is messier, requires ventilation, and hardens instantly on contact. Most beginners should stick with wax emulsion.
You can find wax emulsion from suppliers like Amaco or Laguna under names like "Wax Resist" or "Potter's Wax." A small bottle goes a long way.
How to Apply Wax Resist to Bisqueware
Your piece should be bisque-fired before you use wax resist. Raw clay is too absorbent and the wax will sink in unevenly. Bisqueware has the right porosity to let the wax sit on the surface and form a clean film.
Step 1: Clean the surface. Wipe off any dust from the bisque firing with a damp sponge and let it dry fully. Dust or oils can prevent the wax from adhering evenly.
Step 2: Shake or stir the wax. Wax emulsion settles in the bottle. Give it a good shake or stir with a brush before use.
Step 3: Apply with a soft brush. Use a dedicated brush that you will not use for anything else. Wax gums up bristles permanently once it dries, so keep separate wax brushes. Apply the wax in smooth, even strokes. Thin coats work better than thick ones. If your wax is dragging or pulling, dilute it slightly with water.
Step 4: Let it dry completely. This is the step beginners most often skip. Wax emulsion dries from clear or milky to a slightly glossy, translucent film. Depending on room temperature and how thick you applied it, that can take 15 to 30 minutes. Glazing over wet wax causes the glaze to smear through the wax and ruin the edge. Touch the surface lightly with a fingertip. If it feels at all tacky, wait longer.
Common uses for wax application:
- Foot rings. Wax the foot ring and the bottom of the piece so no glaze ends up there. Glaze on the foot causes the piece to stick to the kiln shelf. This is the most practical use of wax resist for any beginner. Read more about how to apply glaze: brushing, dipping, and pouring to see how foot-ring waxing fits into the full glazing process.
- Stripes and bands. Use a banding wheel or a steady hand to paint horizontal lines around a cylinder. Glaze over them and the stripes remain unglazed.
- Geometric patterns. Tape or stencils can mask areas before you apply wax, or you can paint freehand shapes directly.
- Layered color effects. Apply a first glaze, let it dry, wax over parts of it, then apply a second glaze. The second glaze sits only where there is no wax.
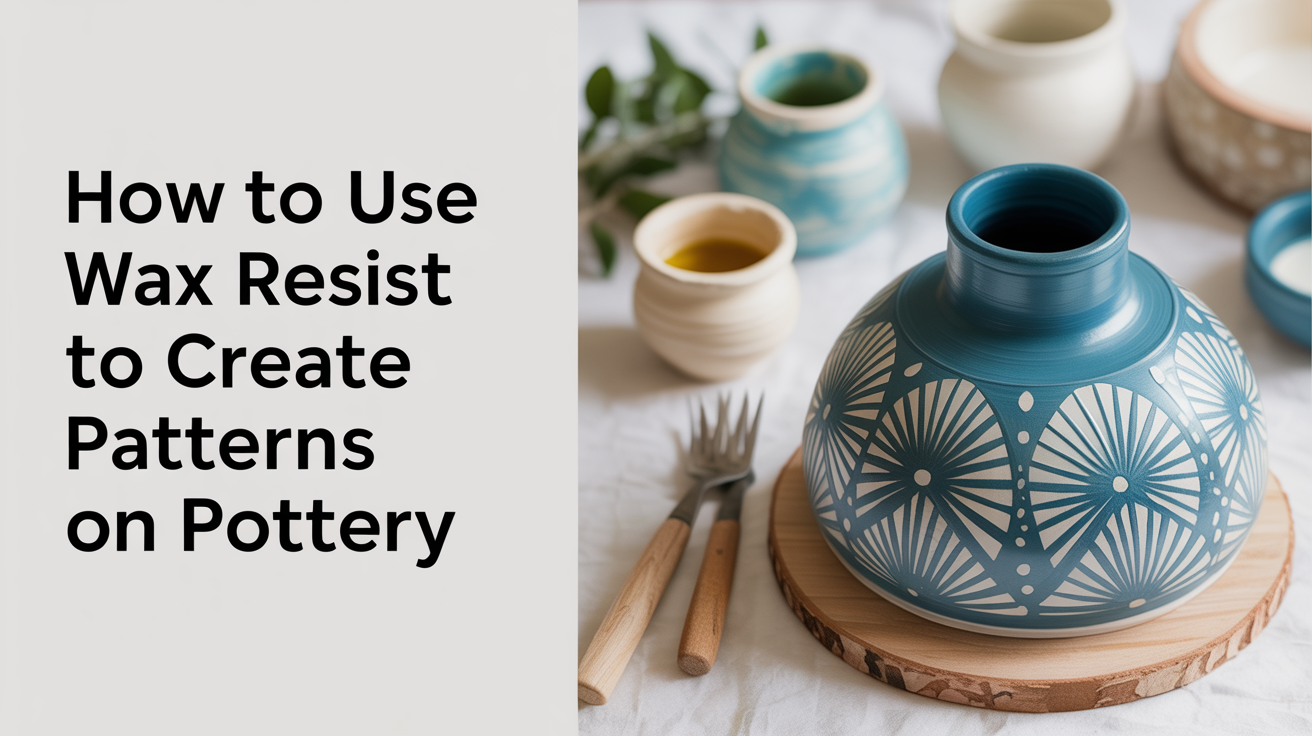
Creating Two-Color Patterns with a Second Glaze
The two-glaze technique is where wax resist becomes genuinely exciting. Here is the sequence:
- Apply your base glaze to the whole piece by dipping or pouring. Let it dry completely. You want a dry, matte glaze surface before you add wax.
- Paint wax emulsion over any areas where you want the base glaze color to show in the finished piece. Let the wax dry fully.
- Apply your second glaze color over the entire piece. The second glaze beads off the waxed areas and adheres to the unwaxed areas.
After firing, the waxed areas show your first glaze color and the unwaxed areas show your second glaze, with a fairly clean line between them. The sharpness of that line depends on how evenly you applied the wax and whether it was fully dry.
A few notes on glaze compatibility: not every combination of two glazes fires to a good result. Check that both glazes are rated for the same cone range. Heavily textured or specialty glazes (crawling glazes, for example) can behave unpredictably in this layering situation. Plain matte or satin glazes in two contrasting colors are the most reliable starting point. For a broader explanation of how glazes behave, see our guide on how pottery glaze works: a beginner's guide.
For alternatives to wax resist when you want to add color before glazing, underglaze for beginners: adding color and designs covers the underglaze approach, which gives you more control over fine detail.
Common Mistakes and How to Avoid Them
Applying glaze too thickly over wax. Thick glaze applied with a brush can push through wax if you scrub it on rather than letting it flow. For the second glaze layer over wax, dipping tends to work better than brushing. If you brush, use light strokes and do not go back and forth over the same area repeatedly.
Not letting the wax dry. As noted above, wet wax smears. The dry time matters. Set a timer if you are impatient.
Using the same brush for glaze and wax. Once wax gets into a glaze brush, the bristles become stiff and the brush picks up wax from dried residue in future sessions. Keep dedicated wax brushes and label them.
Wax on the wrong areas. If you accidentally wax where you did not intend, the wax is not easy to remove from bisqueware. You can try scraping it off gently with a wooden tool or warming the piece slightly to soften it, but results are mixed. The safest approach is to work slowly and intentionally.
Firing pieces with wax when the studio has poor ventilation. Wax burning off in the kiln produces some smoke and fumes. This is normal and generally mild with wax emulsion, but studios should have adequate ventilation during any glaze firing. If you fire in a small space, make sure air is moving.
Frequently Asked Questions
Can I use wax resist on raw clay or greenware? No. Raw clay is too absorbent and the wax will not sit on the surface properly. Wax resist works on bisqueware, after the first firing. It can also be applied over a dry unfired glaze layer when you want to add a second glaze color on top.
Does the wax smell when it burns off in the kiln? Wax emulsion produces some odor and light smoke when it burns off, typically in the lower temperature range of a glaze firing. This is why studio kilns should be well ventilated. With proper airflow it is not a significant concern for most studio environments.
Can I wax over underglaze? Yes. You can apply wax over fired underglaze (on bisqueware with underglaze decoration already applied) and then add a clear or colored overglaze on top. The wax prevents the overglaze from covering the underglaze in selected areas, which can create interesting effects.
What if the wax drips where I did not want it? Small drips on areas that should be glazed will show up in the fired piece as unglazed spots. Catch drips while the wax is still wet by blotting carefully with a paper towel. Once the wax is dry, careful scraping with a wooden tool is your best option, though it is hard to remove completely without damaging the bisque surface.
How do I clean wax emulsion off my brushes? Clean them with warm water while the wax is still wet. Once dry, wax emulsion is difficult to remove from brush bristles. This is why dedicated wax brushes make sense. Some potters keep an old, worn brush specifically for wax and never worry about restoring it.