Wheel Throwing
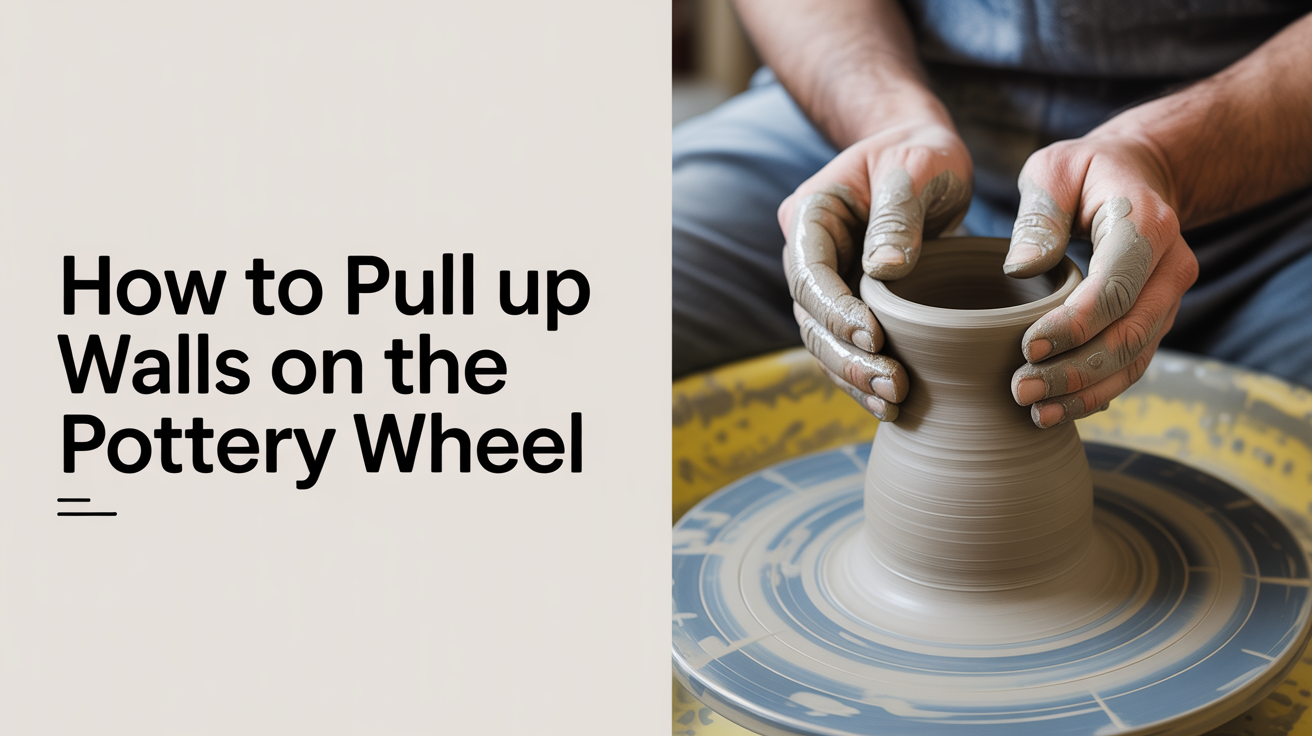
How to Pull Up Walls on the Pottery Wheel
Learn how to pull up walls on the pottery wheel with correct hand position, wheel speed, and water use to throw thin, even walls every time.
Pulling up walls is the moment wheel throwing clicks. You anchor a knuckle against the outside of the clay and press a fingertip against the inside, then lift both hands together in one slow, steady movement that draws the clay upward. Done right, three or four of those pulls can take a squat lump and turn it into a cylinder with honest height and even thickness.
Before you can pull, though, the clay needs to be opened and compressed correctly. If the floor is uneven or the base is too thick, every pull after that fights an uphill battle.
Setting Up After Opening
A good pull starts with a good base. After you open the clay and spread the floor, take a moment to compress and level it.
Compress the Base
Use two or three fingers pressed flat to compress the floor of the pot in a slow outward spiral. This packs the clay particles and reduces the chance of an S-crack forming later during drying. Press firmly but don't drag, and finish with a clean edge where the floor meets the wall.
Establish an Even Cylinder
Before pulling for height, make sure the walls are roughly the same thickness all the way around. Run your pinched fingers up the inside and outside together, slowly, just once. You're not pulling yet, just reading the clay. If one side is obviously thicker, nudge the clay inward on that side with gentle outside pressure before your first real pull. Check out how to center clay on the pottery wheel if the form still feels off-center at this stage.
Hand Position for the Pull
This is the part most beginners get wrong, usually because they try to muscle the clay upward with their fingertips alone.
The correct setup:
- Wet both hands.
- Place your dominant hand inside the cylinder, fingertips touching the wall at about the 6 o'clock position.
- Place your outside hand so a knuckle (the middle joint of your index finger works well) presses against the outside wall, directly opposite your inside fingertip.
- Let your inside fingertip and outside knuckle pinch together gently, with just enough pressure to feel the thickness of the wall between them.
- Keep your elbows braced against your thighs or the splash pan rim for stability. A floating elbow means a wandering pull.
The pull itself is a coordinated lift: both hands move upward together at the same pace. Your hands are not squeezing harder as they rise; they maintain steady, equal pressure. Think of the clay as being coaxed up rather than forced.
Wheel Speed: Slower Than You Think
Most beginners center at full or near-full speed, which is correct. Pulling walls happens at a medium speed, noticeably slower.
A practical guide:
- Centering: wheel running fast, maybe 80-90% of top speed.
- Opening: medium-fast, slow slightly as you spread the floor.
- Pulling walls: medium, roughly half speed or a bit less.
The slower speed gives you more control over the contact between your hands and the clay. At high speed, any tiny wobble in your grip gets amplified. At medium speed, you can feel the clay moving and correct course. As the walls get taller and thinner, slow down a little more with each successive pull. A very thin wall on the third or fourth pull needs a calm, deliberate pace.
Water and Lubrication
Wet clay slips. Dry clay drags, heats up, and tears. Keeping the right amount of water on the clay is a real skill, not an afterthought.
A few principles:
- Add water before each pull, not in the middle of one. Stop, wet both hands lightly, then begin the next pull from the bottom.
- You want the surface slick but not soupy. Too much water weakens the clay over time and can cause the walls to collapse.
- Use a sponge to apply water rather than dunking your hand into a bucket and dripping all over the pot. A damp sponge gives you control.
- If the clay starts to feel sticky or you hear a slight tearing sound as your hands rise, you need more lubrication.
- If the form feels floppy or the walls are bulging outward, you've added too much water. Let the wheel run for a moment to throw off surface water before continuing.
Lifting in Stages
A single pull rarely gives you the full height you want. Plan for 3-4 pulls, each one refining the form a little more.
Here is a simple sequence:
- First pull: Start at the base, fingers at the very bottom of the wall where it meets the floor. Apply light pinching pressure and lift slowly all the way to the rim. This pull opens up the form and gives it initial height.
- Second pull: Add water. Start again at the base. Apply slightly more pressure than the first pull. This is where most of the height comes from.
- Third pull: Add water. Lighter pressure than the second pull. You're refining the wall thickness and straightening the cylinder. This pull should feel more like smoothing than squeezing.
- Fourth pull (if needed): Very light pressure. Mainly used to even out any slight variations in wall thickness before collaring or shaping.
Always start each pull from the very bottom of the wall. If you start even slightly above the base, you leave a thick ring of clay at the bottom that you'll keep running into. For a full walkthrough of how these stages fit into throwing your first pot, see wheel throwing for beginners: your first pot step by step.
Keeping Walls Even
Uneven walls are the most common frustration at this stage. The wall might be thin at the top and thick in the middle, or vice versa. A few habits help.
Collar Between Pulls
After each pull, apply a brief collar: both hands wrap loosely around the outside of the form, moving slowly from base to rim. This tightens and straightens the cylinder and compresses any slight irregularities before the next pull begins. Don't squeeze hard, just guide the clay inward gently.
Check Thickness by Feel
Pinch the wall lightly between your thumb and forefinger at different heights. You should feel consistent resistance all the way up. A squishy spot means thin; a stiff spot means thick. Focus your next pull on those areas.
Watch the Rim
A rim that wobbles or flares outward signals unevenness below. If the rim is going out of round, stop and use light outside pressure to bring it back before the next pull.
Common Faults and Fixes
Most problems in pulling walls come down to a handful of repeating issues.
Common problems and what to do:
- Walls flaring outward: Your inside hand is pushing out more than your outside hand is containing. Increase outside pressure slightly, or use a collar immediately after the pull to bring the walls back in.
- Thick base that won't thin out: You didn't start your pull at the very bottom. Begin each pull with your inside fingertip touching the floor-wall junction, and compress the base more thoroughly after opening.
- Walls twisting or spiraling: The wheel is running too fast for the height of the form, or your hands aren't moving straight up. Slow the wheel and consciously lift vertically rather than at an angle.
- Rim cracking or tearing: The clay is too dry or too stiff. Add more water at the rim before pulling, and check that you're using well-prepared clay. Proper wedging removes air pockets that cause tearing; see how to wedge clay and why you have to for the technique.
- Form collapsing outward: Too much water, too many pulls, or the clay is overworked. If the walls feel very soft and begin to buckle, stop. Let the wheel run slowly for 30 seconds to firm up the surface, then assess.
- Uneven wall height around the rim: The clay wasn't fully centered before opening. You can trim a wobbly rim level with a needle tool while the wheel spins, then compress the cut edge with a damp fingertip.
Frequently Asked Questions
How many pulls does it take to throw a cylinder?
Most beginners use 3-4 pulls. A very experienced potter might do it in 2, but there's no prize for fewer pulls. Take as many as you need to get even walls, as long as you add water between each one and don't overwork the clay.
Why do my walls keep getting thicker at the bottom?
Usually because the pull is starting too high. Plant your inside fingertip at the very bottom of the wall, touching the floor, before every pull. The base naturally resists thinning, so it needs direct attention on each pass.
Should I use both hands on every pull?
Yes. Using only one hand means uneven pressure and a wall that goes off-center. The inside hand and outside hand work as a pair, applying matched force from opposite sides of the clay.
How do I know when the walls are thin enough?
Hold your hand just outside the spinning wall without touching it. As the cylinder rotates, you can see light through very thin walls. A more reliable method is to gently pinch the wall between your fingers at several heights and compare the resistance. For a basic cylinder, aim for about 5-7 mm of wall thickness. Thinner than that is fine for experienced throwers, but beginners risk collapse.
Why does the top of my cylinder always flare out?
The rim flares when the inside hand is pushing out at the top of the pull without matching outside support. Two fixes: slow down at the rim, and finish each pull with a brief collar that wraps both hands around the top of the form to bring it back in.