Hand-Building
How to Make a Slab Plate or Shallow Dish for Beginners
Learn how to make a clay plate by hand using the slab method. Step-by-step guide covering rolling, shaping, drying, and finishing your first slab plate.
Slab plates are one of the most satisfying first hand-building projects you can tackle. Unlike a pinch pot or a coil vessel, a slab plate starts flat and stays flat, which means every stage of the process is visible and easy to correct. You roll out a sheet of clay, drape it over a simple form, smooth the edges, and let it dry slowly. The result is a functional piece you can actually eat from once it is bisque-fired and glazed.
This guide walks through the complete process of making a slab plate or shallow dish, from wedging your clay to getting it ready for the kiln.
What You Need Before You Start
You do not need a wheel or a kiln of your own to hand build a slab plate. Many community studios charge by the pound of clay and handle firing for you.
Clay: A mid-fire stoneware (cone 5-6) works well for plates. It has good strength during drying, shrinks evenly, and fires to a food-safe result with a proper glaze. Avoid very fine porcelain for your first plate; it cracks more easily when slabs are thin.
Rolling tools: A rolling pin (dedicated to clay, never food) and two wooden guide sticks or slats of the same thickness. The guide sticks keep the slab uniform. A thickness between 6 mm and 8 mm (roughly 1/4 inch) is a good target for a beginner plate.
A hump or slump mold: A hump mold is a convex form you drape clay over; a slump mold is a concave form you press clay into. Both produce a slightly curved plate. A bisque-fired bowl or a plaster bat mold both work. You can also use a large cereal bowl lined with a thin sheet of plastic.
Canvas or cloth: Roll your slab on a piece of canvas. It prevents sticking and makes it easy to flip the slab onto your mold.
Finishing tools: A metal rib or plastic scraper, a loop tool for trimming the foot, and a damp sponge.
How to Roll and Transfer a Slab
Start by wedging your clay for about two minutes to remove air pockets and make the texture consistent throughout. A two-pound lump is enough for a plate around 25 cm (10 inches) across.
Flatten the lump with your palm, set your guide sticks on either side, and roll from the center outward. Rotate the canvas 90 degrees after every few passes so the slab stretches evenly in all directions rather than elongating in one direction. When your rolling pin rides smoothly along the guide sticks without dropping into the clay, the slab is done.
Let the slab firm up for 15 to 30 minutes before moving it. A slab that is too soft will stretch and sag when you lift it. It should feel like firm leather on the surface but still bend without cracking.
To transfer it to a hump mold: flip the canvas over the mold so the slab lands centered on top, then peel the canvas away from the clay (not the clay away from the canvas).
To use a slump mold: cut the slab into a rough circle, set it over the mold opening, and let it settle in gently. Do not press it down. Gravity does the work over the next hour.
For more on the broader technique, see Slab Pottery for Beginners.
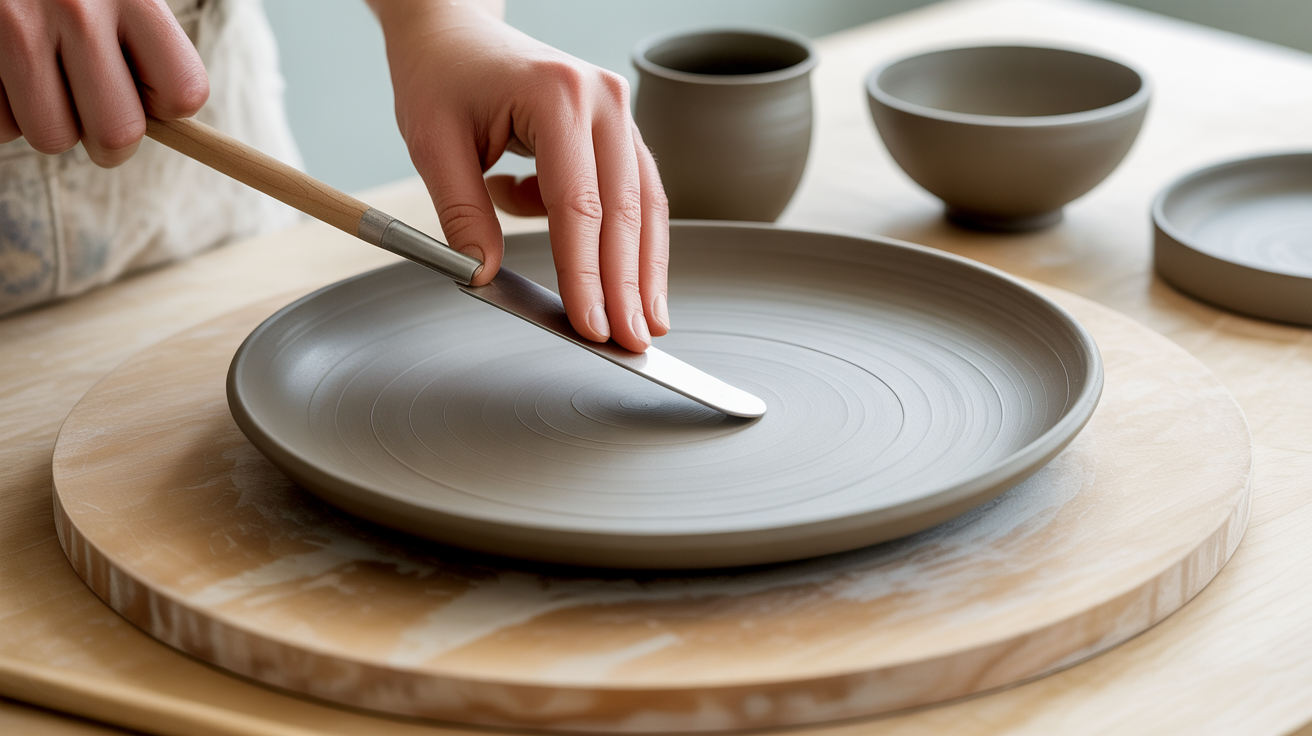
Shaping and Trimming the Rim
Once the slab is draped on the mold and has stiffened to leather-hard (the clay is cool to the touch, holds its shape, but still has some give), trim the rim.
Use a needle tool or a sharp knife and a template cut from cardboard to trace the final outline. A circle is simplest, but an oval or a freehand organic shape works too. Cut with the tool held perpendicular to the surface for a clean edge.
After cutting, smooth the rim with a damp finger or a small rubber rib. Work around the edge in short strokes, compressing the clay slightly as you go. This seals tiny cracks that form when clay is cut and reduces the chance of the rim chipping after firing.
Optional foot ring: A foot ring lifts the plate off the table and gives it a more finished look. To add one, roll a coil about 1 cm thick, score the underside of the plate and the top of the coil with a fork, apply slip (clay mixed with water to a thick cream), and press the coil in place. Blend the inside edge with a small tool. Keep the foot ring at least 2 cm from the outer edge so the plate sits stable. For more on working with coils, see Coil Pottery for Beginners.
Drying Without Cracking
Plates crack during drying more than almost any other beginner form. The problem is uneven drying: if the rim dries faster than the center, the rim shrinks first and pulls against the wetter middle.
| Problem | Cause | Fix |
|---|---|---|
| Rim cracks | Rim dried too fast | Cover rim with plastic strips, leave center exposed |
| Center humps up | Stuck to mold | Use a sheet of plastic or newspaper between clay and mold |
| S-crack through center | Rolled slab compressed unevenly | Roll slab in more directions next time; compress with rib |
| Warped base | Dried flat on impermeable surface | Dry on a plaster bat or wire rack for air circulation |
Leave your plate on the mold for the first 12 to 24 hours, then move it to a flat, breathable surface. Loosely drape plastic over the whole piece to slow the drying. In a warm, dry room, a plate may be ready to bisque in three to five days. In a damp climate, give it a full week.
The plate should feel room temperature, not cool, before you load it into the kiln. Cool clay still holds moisture.
Surface Decoration Before Bisque
Leather-hard clay accepts quite a few decorative treatments.
Texture: Press a textured fabric, a leaf, or a rubber stamp into the surface while the clay is still slightly soft. The impression holds through firing.
Slip trailing: Pour colored slip into a squeeze bottle and draw lines or dots onto the plate surface. Slip is most stable when applied at the same leather-hard stage as the clay.
Carving: Use a loop tool or a pointed wooden dowel to scratch designs into the surface. This works best when the clay is firm leather-hard, not soft.
Mishima: Fill carved lines with contrasting colored slip, let it dry until chalky, then scrape the surface smooth. The color stays in the grooves.
These techniques all happen before bisque firing. Underglaze, which is a colored version of glaze, can also be brushed on at leather-hard and builds color that shows through a clear glaze on top.
If this is your first piece entirely, read How to Make a Pinch Pot for a lower-stakes introduction to clay behavior before committing to a plate.
Frequently Asked Questions
Can I make a slab plate without a mold? Yes. Roll the slab, let it firm to leather-hard, then shape the rim by hand by pressing it up slightly to create a lip. You can also rest the slab in a ring of coils to hold a gentle curve while it dries. A mold just makes the curve more uniform and repeatable.
What thickness should a beginner plate be? Six to eight millimeters (about 1/4 inch) is a good starting range. Thinner than 5 mm is prone to warping and cracking during drying. Thicker than 10 mm takes much longer to dry evenly and can crack if the kiln rises in temperature too quickly during bisque.
My plate is warping while it dries. What went wrong? Warping almost always means one side dried faster than the other, or the plate was left on a non-porous surface that trapped moisture underneath. Flip the plate halfway through drying so both sides are exposed equally, and dry it on a wire rack or plaster bat rather than a solid shelf.
Do I have to use a foot ring? No. A flat bottom works fine, especially for a first plate. A foot ring is a finishing detail that also protects table surfaces from any rough clay texture on the base. If you add one, keep it thin so it dries at the same rate as the plate.
Can I use air-dry clay for a plate I will eat from? Air-dry clay is not kiln-fired and is not food-safe, even with a sealant on top. For a functional plate or dish, use a kiln-fired clay body and a tested food-safe glaze applied inside and on the rim, fired to the temperature the glaze manufacturer specifies.