Wheel Throwing
How to Trim a Pot and Cut a Clean Foot Ring
Learn how to trim pottery at leather-hard stage, cut a clean foot ring, and avoid the common mistakes that collapse or warp your pot.
Trimming is the step that separates a wobbly lump from a finished pot. You throw a rough shape on the wheel, let it stiffen to leather-hard, then flip it upside down and carve away the excess clay from the base. What you leave behind is the foot ring: the narrow circular wall that will raise the pot off a shelf and frame the bottom in a way that looks intentional.
The whole process takes five to ten minutes once you know what you are doing. If you have already worked through centering clay on the pottery wheel and thrown your first pot, trimming is the natural next step.
When Is Clay Ready to Trim?
Timing is everything. Clay that is too wet will distort the moment a trimming tool touches it. Clay that is too dry will chip, crack under pressure, or refuse to shave cleanly.
Leather-hard is the right state. Pick up a small piece of scrap clay from the same batch you threw with and squeeze it gently. It should hold its shape without smearing onto your fingers. It will feel cool and firm, like cold butter, but not brittle. A pot at this stage keeps its curve when you press lightly on the wall.
Signs your pot is ready:
- The clay has gone from shiny to a flat, matte finish
- The wall springs back slightly when you press it
- The rim has dried enough that it no longer deforms when you handle it
- The base is cool but not cold and dry all the way through
If the base is still noticeably heavier and wetter than the rim, give it more time. Wrapping the rim loosely with plastic while the base catches up can help even things out.
Tools You Need
You do not need a large collection of trimming tools to start. A loop tool and a needle tool will handle most work at the beginner stage.
| Tool | What it does |
|---|---|
| Loop trimming tool | Shaves and scoops clay from the base; the most-used tool for foot rings |
| Wire loop (ribbon) tool | Good for broad sweeping cuts on chunky bases |
| Needle tool | Checks wall thickness; scribes lines for the foot ring |
| Wire tool | Cuts the pot free from a bat before flipping |
| Bat or banding wheel | Holds the pot steady while you work |
Metal loop tools stay sharp longer than plastic ones and give you cleaner cuts. If you have only one, start with a small or medium loop.
How to Center and Secure the Pot Upside Down
Flip the pot and place it rim-down on the wheel head or on a bat. The pot needs to be centered before you trim; otherwise the foot ring will be off-center and the wall thickness will vary.
To center a flipped pot:
- Tap the pot lightly toward the center while spinning the wheel slowly by hand.
- Hold a pencil or needle tool steady against the wheel head and let the pot spin until the tool touches the clay without wobbling.
- If the pot wobbles, tap the high side inward.
- Once centered, use three or four small coils of soft clay pressed against the rim to anchor it. These clay lugs hold the pot in place without you needing to use a chuck.
Some beginners use a rubber stamp or a piece of foam placed on the wheel head to protect the rim. Either works. The goal is to keep the pot from slipping while you apply downward pressure with the trimming tool.
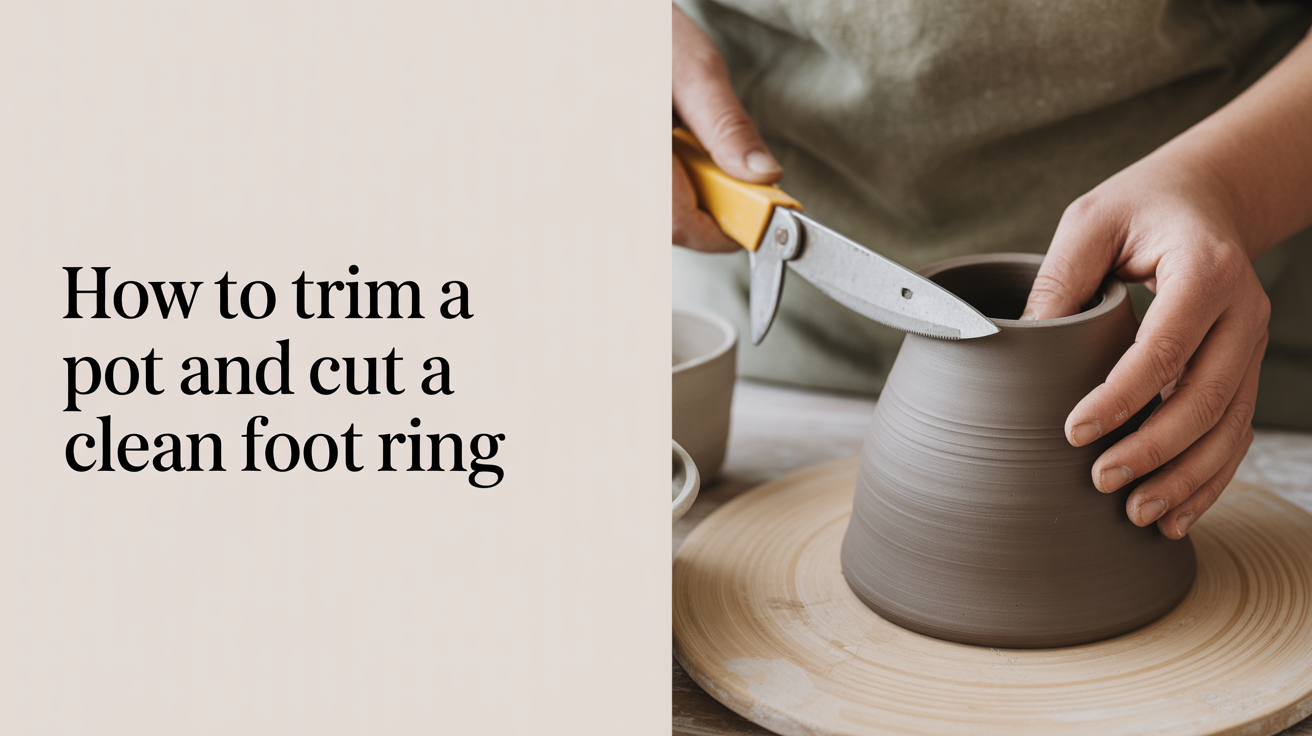
Cutting the Foot Ring: Step by Step
With the pot centered and secured, you are ready to cut.
Mark the foot ring first
Score two light lines with a needle tool while the wheel spins slowly. The outer line marks the outer edge of the foot ring; the inner line marks where the interior of the foot begins. The ring itself sits between them. A typical foot ring is about one-third the diameter of the base, but this varies with the pot's size and style.
Remove the excess clay outside the foot ring
Start at the outer edge and work inward. Hold the loop tool at a slight angle and let the wheel do the work. You are shaving thin layers, not digging. Keep your elbow braced against your body or the splash pan to stay steady.
Stop occasionally and check the outside profile of the pot. Trimming pottery on the wheel should refine the curve you already threw; you want the lower third of the pot to taper naturally into the foot, not to create a sudden ledge.
Hollow out the interior of the base
Switch to working inside the foot ring lines. Use the loop tool to remove the clay in the center of the base, leaving the foot ring walls standing. Work from the outside ring inward, taking thin passes. The base inside the foot will usually end up slightly concave, which is intentional: a slightly dished bottom prevents rocking.
Check wall thickness
Stop, slow the wheel, and press a needle tool straight down through the base until you feel resistance from the wheel head or bat. Mark the needle with your thumb at the clay surface and withdraw it. That measurement is your base thickness. A functional pot usually has a base between 6 and 10 mm, though this depends on the pot's size. The foot ring wall itself can be thinner.
Refine the foot ring
Clean up the edges. The top edge of the foot ring (the part that will rest on a shelf) should be flat or very slightly rounded. A sharp edge is fragile and likely to chip. Bevel it lightly with a corner of your loop tool. The inner and outer walls of the foot ring should be smooth and consistent in thickness.
Common Trimming Mistakes and How to Fix Them
The pot flies off the wheel. Your clay lugs were not secure enough, or you applied too much sideways pressure. Add more anchor coils and keep downward pressure gentle at first.
The foot ring wobbles or is off-center. The pot was not properly centered before you started. Remove the pot, re-center it, and start again. Off-center trimming is much harder to fix partway through.
You cut through the base. This happens when the base was thin to begin with or you took too much at once. Check thickness early and often. If you do cut through, you can patch it with soft clay and let it dry again before bisque firing, though the repair may be visible.
Chipping or crumbling. The clay dried past leather-hard. Mist the base lightly with water and let it absorb for a few minutes. Do not soak it; just soften the surface enough to trim.
Uneven foot ring walls. Usually caused by inconsistent tool pressure or the tool catching and skipping. Slow the wheel down and take lighter passes.
Frequently Asked Questions
Does every pot need a foot ring? No. Shallow bowls, saucers, and some mugs look fine with a trimmed flat base rather than a raised foot ring. A foot ring makes most sense on taller pieces, bowls, and any vessel where the bottom will be visible when the pot is in use. It also lifts the piece off the kiln shelf during glaze firing, which matters when the base needs to be glazed close to the edge.
How thick should the foot ring walls be? Aim for somewhere between 4 and 6 mm on most pots. Thinner than that and the foot is fragile and prone to chipping. Thicker than that and it starts to look heavy and unintentional. As you gain experience, you will develop a feel for proportions that suit different pot sizes.
Can I trim clay that is still wet? You can trim slightly wetter clay if you are careful, but the results are usually poor. Wet clay drags rather than shaves cleanly, and the foot ring walls can collapse inward. Leather-hard trimming gives you control. If you are in a hurry, you can carefully dry the base with a heat gun set to low, but do this slowly and check constantly.
My pot keeps cracking at the base after trimming. What am I doing wrong? Cracking at or near the foot ring usually means the pot dried unevenly. The rim dried fast while the thick base stayed wet, building up stress. Dry your pots slowly, cover them loosely with plastic, and make sure the base and rim reach leather-hard at roughly the same pace. Cracking can also happen if the clay was not properly wedged before throwing, leaving air pockets near the base.
When should I sign the pot? After trimming, while the clay is still leather-hard, is the ideal time to scratch your mark or initials into the base. Use a needle tool or a stamp. Wait until you have finished all your trimming so the signature does not get obscured by clay shavings.